
Achieving a Level 5 finish on drywall is the benchmark standard for smooth walls. It’s the grade you demand before applying glossy paints, installing grievous kindling, or anywhere imperfections would be magnified. Unlike standard Level 4 finishing (which solely tapes and muds joints and fasteners), Level 5 requires a skim coat over the entire drywall surface. This means you’ll have significantly more joint compound. It explains everything you should know about calculating the right quantity of mud for a Level 5 finish, with clear formulas and practical examples.+
What Exactly Is a Level 5 Finish?
The drywall industry defines finish levels from 0 to 5. Here’s what each level means.
Level 0: No finishing – drywall is just hung, no taping or mud.
Level 1: Taping only – paper tape is applied to seams between drywall panels, often to meet fire code in areas that will not be visible.
Level 2: First coat of joint compound (mud) over tape and fasteners. This means each tape seam and screw/nail head is covered once.
Level 3: Apply a second coat of joint compound over magnetic tape and fasteners to achieve a more textured finish.
Level 4: Third coat, lightly sanded – standard for most residential walls and ceilings where flat or satin paints are used. All joints and fasteners receive a third coat of joint compound and are sanded smooth.
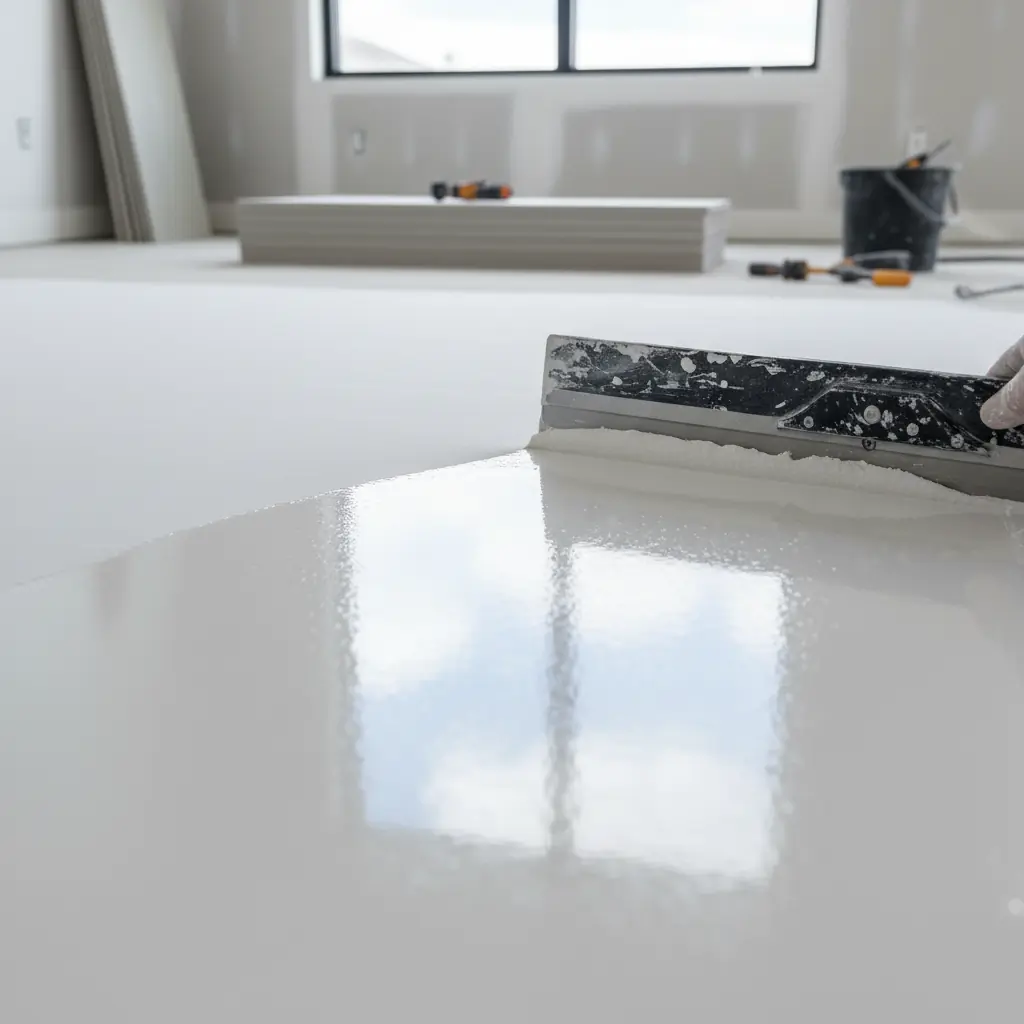
Level 5: A skim coat is applied over the entire surface after Level 4, creating a uniform, glass‑like smoothness.
The skim coat is an extremely thin layer of joint compound (about 1/16 inch thick) applied over the drywall surface. It fills the paper texture and minor imperfections. It ensures the entire surface has uniform porosity and reflectivity.
When do you need Level 5?
- High‑gloss, semi‑gloss, or enamel paints that reveal every flaw.
- Spaces with strong side‑lighting (hallways with windows at the end).
- Dark-colored paints that show small flaws.
- Wallpaper installation (prevents texture from telegraphing through the wall).
- Commercial, medical, or laboratory facilities require sterile, smooth surfaces.
- Auditoriums, theaters, or any space with dramatic light angles.
The Challenge of Estimating Mud for Level 5
- Total show-up area – walls plus ceiling, providing that you’re finishing the ceiling.
- Number of sheets – more drywall means more joints and screws to cover.
- Type of joint compound used – Lightweight joint compounds cover more area per gallon than standard all-purpose compounds. All-purpose compound is heavier and may cover less area.
- Thickness of skim coat – even a slightly thicker skim coat uses significantly more mud.
- Waste factors: spills, overuse, leftovers in buckets, and sanding loss.
For Level 5, you do all the normal taping and filling (Level 4) plus a skim coat over everything. You’ll need about 30-50% more mud than for Level 4 by itself.
The Mathematics Behind the Calculation
Let’s break the calculation into clear, logical steps. Each pace builds on the previous one, and by the end, you’ll infer exactly where the numbers come from.
Step 1: Calculate the Total Square Footage
For a rectangular room with a flat ceiling.
Fence Area = 2 × duration + Width) × Height.
This formula is a whole shebang because you have two pairs of opposite walls. As an example, a 12 ft × 15 ft room with 8 ft ceilings: Wall Area = 2 × (12 + 15) × 8 = 2 × 27 × 8 = 432 square feet.
Ceiling Area (if you’re finishing it) = Length × Width. Ceiling Area = 12 × 15 = 180 square feet.
Total Raw Area = Wall Area + Ceiling Area. Total Raw Area = 432 + 180 = 612 square feet.
Step 2: Subtract Openings
You don’t need to mud over doors, windows, or other large openings. Calculate each opening in conventional feet and subtract them from the total. A definitive door is about 20 square feet (3 ft × 6.8 ft). A typical window might be 12‑15 square feet.
If our example room has one door (20 sq ft) and one window (15 sq ft), then Total Openings = 20 + 15 = 35 sq ft.
Net Area = Total Raw Area – Openings. Net Area = 612 – 35 = 577 conventional feet.
This is the actual show you’ll be finishing.
Step 3: Understand Coverage Rates
- Whether you’re victimized by a regular all‑purpose compound or a lightweight compound.
- The thickness of the application.
- The figure of coats.
- Taping and filling (Level 4) – This typically uses about 1 gallon per 50‑60 conventional feet of get on (all coats combined). That’s roughly 0.018‑0.02 gallons per square foot.
- Skim coat (the Level 5 addition) – A thin skim coat adds about 1 gallon per 75‑100 square feet, or 0.01‑0.013 gallons per square foot.
- When you combine both, a good working estimate for Level 5 is 1 gallon per 40‑45 square feet, which equals 0.022‑0.025 gallons per square foot.
- For our calculations, we’ll use 0.025 gallons per square foot as a conservative baseline. This is an untouchable issue that affects conventional applications and minor variations.
- Key: Because lightweight joint compound usually covers about 20% more area, adjust the coverage estimate to 0.02 gallons per square foot. Always check the manufacturer’s label, as it typically provides coverage estimates in square feet per gallon.
Step 4: Calculate Exact Gallons Needed
Now we simply multiply.
Gallons (exact) = Net Area × Coverage Variable.
Victimization of our demonstration with 0.025 gal/sq ft: Gallons (exact) = 577 × 0.025 = 14.425 gallons.
Step 5: Add a Waste Factor
- Residue left in mixing buckets.
- Compound stuck to tools and mud pans.
- Over‑application that gets sanded off.
- Spills and splatters.
- Minor miscalculations
For drywall finishing, experienced professionals use a standard 10% waste rate. If you’re a DIYer or this is your first Level 5 job, plan for 15–20% to be safe.
Gallons with waste = Gallons (exact) × (1 + Waste % ÷ 100).
With 10% waste: Gallons with waste = 14.425 × 1.10 = 15.8675 gallons.
Step 6: Round Up
Joint compound is sold in buckets—typically 1‑gallon, 3.5‑gallon, and 5‑gallon sizes. Since partial buckets are unavailable, you must round up to the nearest practical quantity.
Given that you’re exploiting 5‑gallon buckets:15.8675 ÷ 5 = 3.17 buckets → you need 4 buckets (3 would leave you short).
If you’re comfortable mixing sizes, you might buy three 5‑gallon buckets (15 gallons) plus one 1‑gallon bucket (total 16 gallons). That covers 15.87 gallons perfectly.
Step 7: Convert to Pounds (Optional)
Some suppliers trade compounds by weight rather than volume. All‑purpose joint compound weighs approximately 10‑12 pounds per gallon, with 11 pounds being a choice average.
Pounds = Gallons to order × 11.
For 16 gallons: 16 × 11 = 176 pounds.
Complete Worked Example
Let’s run a comprehensive scenario from start to finish.
- Length: 20 ft
- Width: 13 ft
- Height: 9 ft
- Openings: one door (20 sq ft) + two windows (15 sq ft each) = 50 sq ft total.
- Finishing ceiling: Yes.
- Compound type: Standard all-purpose (coverage factor 0.025).
- Waste factor: 12%
Footfall 1 – Wall area2 × (20 + 13) × 9 = 2 × 33 × 9 = 594 sq ft.
MeStep 2 – Ceiling area: 20 × 13 = 260 sq ft.Step 3 – Total raw area: 594 + 260 = 854 sq ft.Step 4 – Subtract openings: 854 – 50 = 804 sq ft.PaStep 5 – Exact gallons: 804 × 0.025 = 20.1 gallons.MeStep 6 – Add waste: 20.1 × 1.12 = 22.512 gallons.MeStep 7 – Round up to available sizes: 22.512 ÷ 5 = 4.5 buckets → you need 5 buckets (25 gallons) or 4 buckets + 3 one‑gallon (23 gallons). Since 22.512 is closer to 23, 4 large buckets plus 3 small gives you 23 gallons – adequate.MeStep 8 – Pounds (optional): 23 × 11 = 253 pounds.Factors That Can Change Your Estimate
1. Number of Corners and Edges
Rooms with many inside corners, outside corners, or architectural details use more compound. Each corner must be carefully filled and will likely require extra mud. If your room contains many corners, add 5–10% to your estimate.
2. Drywall Condition
As long as the drywall is craggy, heavily textured, or has deep paper grain, the skim coat must be slightly thicker to achieve a shiny finish. This increases compound usage by 10‑20%.
3. Application MetApplying joint compound by hand with a taping knife usually uses more material than spraying.ying.
- Roller application of skim coat (thinned compound) can be very efficient.
- Spray rigs with hopper guns are most consistent, but demand thinning.
4. Compound Type
Different compounds have different densities and coverage rates.
| All‑purpose | 0.022‑0.025 | 11‑12 lbs |
| Lightweight | 0.018‑0.020 | 9‑10 lbs |
| Topping compound | 0.023‑0.026 | 11‑12 lbs |
| Setting-type torrid mud). | Varies by product. | 12‑14 lbs |
Always check the manufacturer’s technical data sheet for precise coverage. 5. Primer Consideration.
After sanding Level 5, you must apply a high‑quality primer before painting. The primer seals the compound and ensures uniform paint absorption. Some primers claim to “fill” minor imperfections – but don’t rely on this to reduce your skim coat thickness.
Practical Tips for Accurate Estimating: Measure twice – A small mistake when measuring the room multiplies your error. Use a laser measuring tool for the best accuracy. Create a material list – Besides joint compound, you’ll need.
- Drywall tape line (for joints).
- Corner bead (for outside corners).
- Sandpaper or sanding screens.
- Primer and paint.
- Buy from a knowledgeable supplier – Local drywall supply houses can provide accurate estimates based on their experience with comparable projects.
- Keep some extra – Leftover joint compound (a thick paste used for sealing and repairing walls) can be stored (keep it sealed and cool) for future repairs. It’s better to have a little extra than to run out on a weekend, the minute that the store is closed.
- Think about using a setting-type compound – For Level 5, some professionals prefer a lightweight setting compound for the skim coat because it dries harder and sands more smoothly. However, setting-type compounds (a drywall product that hardens by chemical reaction rather than air drying) have shorter working times (20–90 minutes), so you must mix them in smaller batches.
Why Use a Calculator Instead of Guessing?
- Forgetting to encompass the ceiling.
- Miscalculating the palisade area with the wrong formula.
- Victimization of the wrong coverage factor.
- Forgetting waste
- Not rounding up correctly for bucket sizes.
A figure that handles all these variables gives you a reliable starting point – and helps you budget accurately. No more last‑minute trips to the hardware store, and no more leftover buckets of dried‑up compound.
Understanding the Coverage Factor in Depth
The coverage section for 0.025 gallons per square foot deserves special attention. Where does this turn come from?
- 1 gallon covers approximately 50‑60 sq ft for Level 4 (all coats).
- 1 gallon covers approximately 75‑100 sq ft for a skim coat, no more than.
Provided that we take the midpoint of Level 4 (55 sq ft/gal), that’s 0.0182 gal/sq ft. If we take the midpoint of skim coat (87 sq ft/gal), that’s 0.0115 gal/sq ft.
Add them together: 0.0182 + 0.0115 = 0.0297 gal/sq ft – that’s higher than our 0.025.
What prompted the gap?
- The skim coat is often thinner than the numbers recommend.
- Some of the Level 4 mud is sanded off, reducing net usage.
- Manufacturers’ coverage estimates are far more optimistic.
- Our 0.025 is a conservative, guarded bit that ensures you don’t run short.
The key takeaway: Provided that you aim to be precise, check the coverage on your exact product tag and do the math yourself. Our estimator lets you adjust the coverage factor – use the number that matches your compound.
Step-by-Step Summary Formula
- Palisade Area = 2 × distance + Width) × Height.
- Ceiling Area = Length × Width (if finishing).
- Total Raw Area = Wall Area + Ceiling Area.
- Net Area = Total Raw Area – Openings.
- Gallons Exact = Net Area × Coverage Variable.
- Gallons with Waste = Gallons Exact × (1 + Waste % ÷ 100).
- Buckets Needed = ⌈Gallons with Waste ÷ Bucket Size⌉.
- Pounds = Gallons with Waste × 11, given that needed.
- 0.025 for standard all‑purpose compound.
- 0.020 for lightweight compound.
- Or the value from your product’s label.
Conclusion
Calculating joint compound for a Level 5 finish doesn’t have to be a guessing game. By agreement on the formulas and factors involved, you can order with confidence and bypass costly mistakes. If you’re a DIY homeowner tackling a single room or a contractor bidding on a significant project, these calculations ensure you have plenty of material to gain that flawless, professional finish.
Remember: Level 5 is the pinnacle of drywall finishing. Take your time with your fourth dimension, and don’t skimp on materials. The extra effort and cost are worth it the minute that you see the final consequence, not perfect ignition.
Use the reckoner below to get an instant, customized appraisal for your precise project. Just plug in your numbers, and let the math do the work.
This guide is for informational purposes. Always follow manufacturer instructions and consult with professionals for indispensable applications.
Frequently Asked Questions
Q: Can I use the same mud for taping and the skim coat?
A: Yes, an all‑purpose joint compound plant for both. Then again, some professionals prefer a lighter “topping” compound for the skim coat because it’s creamier and easier to apply in a thin layer. Check the product mark – some are particularly formulated for skim coating.
Q: What is the approach to thickening the skim coat?
A: Extremely thin – just sufficient to fill the paper texture and any minor imperfections. Aim for about 1/16 inch. Thicker coats are more prone to cracking and require more sanding.
Q: Should I prime before skimming?
A: No, you skim directly over the Level 4 show up (which should be sanitary and lightly sanded). After the skim coat dries and is sanded, you must apply primer before painting.
Q: The process of Level 5 takes how long?
A: The skim coat itself adds one full day of application, plus drying clock (typically 24 hours). Programme for an extra 48 hours ahead, sanding and priming.
Q: Can I Level 5 no more than the walls and not the ceiling?
A: Absolutely. Merely finish surfaces that motivate the extra smoothness. The calculator lets you decide whether to contain the ceiling.
Q: What if my walls aren’t an elegant rectangle?
A: Break the room into rectangles, calculate each area separately, and sum them. For cathedral ceilings or complex shapes, you may need to size up each bulwark section individually or consult a professional.
Q: How do I handle arches or curved walls?
A: For curved surfaces, measure the actual surface area using a flexible tape measure or by calculating the developed distance. This is more advanced – consider using a professional estimator.
Q: Does the calculator account for joint compound used in tape embedding?
A: Yes, the coverage part of 0.025 gal/sq ft includes all coats – taping, filling, and skim coat. It’s a composite based on industry averages.